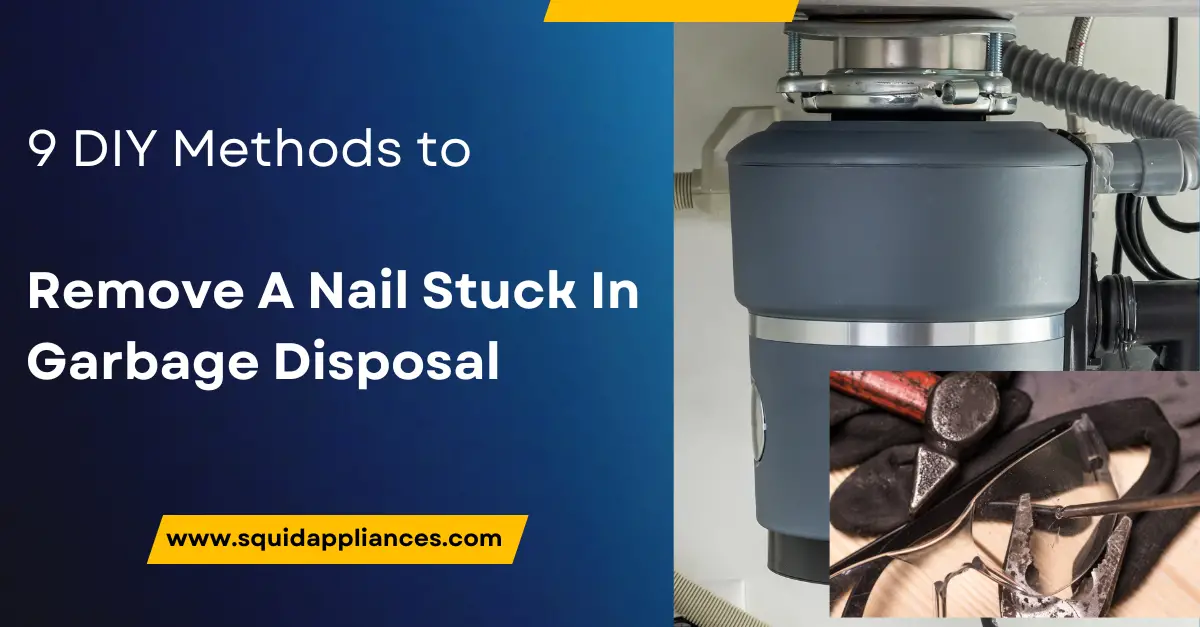
Have you ever found yourself in a sticky situation with your garbage disposal? Well, let me tell you, I’ve been there too. It’s like trying to remove a nail stuck in your disposal is as challenging as untangling a knot of wires.
Today, I’m here to guide you through this daunting task step-by-step. In this article, we will explore the necessary tools and materials you’ll need for the job.
How to Remove A Nail Stuck In Garbage Disposal?
To safely remove a nail stuck in your garbage disposal, first, turn off the power supply. Gather necessary tools like pliers, a flashlight, and an Allen wrench. Carefully insert the pliers to grab the nail, pulling it out without touching other components. Always check for potential damage after removal, like motor damage, blade issues, and electrical wiring problems.
Key Takeaways
- Turning off the power supply is crucial before attempting to remove a nail stuck in the garbage disposal.
- Locating the electrical switch and circuit breaker panel is essential to safely turn off the power.
- When handling electrical switches, it is important to follow safety precautions.
- After removing the nail, it is important to check for any potential damage and take necessary preventive measures.
Why do my lights flicker when I turn on the garbage disposal? 5 Surprising Reasons.
Step # 1: Gather the Necessary Tools and Materials
Now, let’s get all the tools and materials you’ll need to rescue your garbage disposal from that stubborn nail! Safety precautions are of utmost importance when working with garbage disposal, so before we begin, make sure to unplug it or turn off the power at the breaker box.
To safely remove a nail stuck in your garbage disposal, you’ll need a few essential tools and materials. First, grab a pair of sturdy work gloves to protect your hands from potential injuries.
Next, locate an Allen wrench or hex key that fits the size of the disposal’s reset button. This tool will allow you to manually rotate the disposal’s blades.
Additionally, keep a flashlight handy so you can clearly see what you’re doing inside the unit. You might also find it helpful to have a pair of needle-nose pliers or tweezers for extracting any small debris or nails.
When gathering these items, be mindful of common mistakes to avoid. Never stick your hand directly into the garbage disposal without proper protection or attempt to use excessive force when trying to free the nail. These actions can lead to serious injuries or damage to both yourself and your appliance.
By following these safety precautions and avoiding common mistakes, you’ll be well-equipped and ready to tackle removing that pesky nail from your garbage disposal!
What To Do If Your Hand Is Stuck In A Garbage Disposal?
Step # 2: Turn Off the Power
To begin the process of removing a nail stuck in your garbage disposal, the first step is to locate the electrical switch. This can typically be found on the wall near the sink or underneath the sink itself.
Once located, it’s important to turn off the power supply to ensure safety during the removal process.
Step # 3: Locate the electrical switch
First, you’ll want to find the electrical switch to ensure your safety before proceeding further. It’s crucial to locate the electrical switch before attempting any repairs on your garbage disposal.
Regular maintenance is important for garbage disposals to prevent issues like clogs and damage caused by foreign objects, such as nails. By turning off the power, you eliminate the risk of electric shock or injury while working with the tools at your disposal.
Additionally, it’s vital to avoid some common mistakes when using a garbage disposal, such as overloading it with large quantities of food waste or disposing of non-food items. These mistakes can lead to blockages and potentially damage the disposal mechanism.
Therefore, finding and switching off the electrical switch is an essential step in safely removing a nail stuck in your garbage disposal.
Step # 4: Turn off the power supply
Before proceeding any further, you’ll want to make sure the power supply is turned off, right? It’s crucial to prioritize electrical safety when dealing with household maintenance. When it comes to power supply issues in home appliances like your garbage disposal, taking the necessary precautions is essential.
Here are the steps you need to follow to turn off the power supply. First, locate the circuit breaker panel in your home. Open it and find the switch labeled ‘garbage disposal’ or something similar. Flip that switch into the ‘off’ position.
Alternatively, you may have a dedicated electrical switch for your garbage disposal under your sink or on a nearby wall. Make sure this switch is also turned off.
By turning off the power supply, you eliminate any risk of electric shock while working on your garbage disposal.
Step # 5: Remove the Nail
Now, gently grab hold of the nail and carefully pull it out of the garbage disposal. Follow these steps to ensure a safe and successful removal:
- Make sure the power supply is still turned off to prevent any accidents or injuries.
- Use a pair of pliers or tweezers with a long handle for better grip and reach.
- Slowly insert the pliers into the disposal, ensuring you have a firm grasp on the nail without touching any other components.
- Apply steady pressure while pulling the nail straight outwards.
Remember to take preventive measures when dealing with a stuck nail in your garbage disposal. Always turn off the power supply before attempting any repairs or maintenance tasks. This will minimize the risk of electrical shocks or accidental activation of the disposal unit.
Additionally, follow safety precautions by wearing protective gloves to avoid injury from sharp edges inside the disposal chamber. Keep your fingers away from moving parts and be cautious not to drop anything else into the open chamber while removing the nail.
By following these steps and taking necessary precautions, you can safely remove a stuck nail from your garbage disposal without causing further damage or harm.
Step # 6: Check for Damage
Once you’ve successfully extracted the foreign object from your disposal, it’s imperative to assess for any potential harm caused. Inspecting for potential hazards is crucial to ensure the safe and efficient operation of your garbage disposal. Here are some safety precautions and steps to follow when checking for damage:
| Potential Hazards | Safety Precautions |
|---|---|
| Motor Damage | Turn off the power supply before inspecting. Look for signs of overheating or burning smell. If damaged, contact a professional technician. |
| Blade Issues | Use a flashlight to examine the blades carefully. Look for any bending, chipping, or dullness. Avoid touching the blades with bare hands to prevent injuries. |
| Jamming | Run water and turn on the disposal briefly to check if it’s working smoothly without any unusual noises or vibrations that might indicate jamming issues. |
| Leakage | Inspect under the sink for any leaks or moisture around the disposal unit. Tighten connections if necessary or call a plumber if there are significant leaks. |
| Electrical Wiring | Check the wiring connections inside the electrical box for loose wires or frayed insulation. Ensure all connections are secure and undamaged. |
Step # 7: Turn the Power Back On
To turn the power back on for your garbage disposal, first, locate the electrical switch. This switch is usually located underneath the sink or on a nearby wall.
Once you’ve found it, simply flip it to the ‘on’ position to restore power to your disposal. Make sure to check that the power supply is functioning properly before proceeding with any further steps.
Step # 8: Locate the electrical switch
First things first, you gotta find that electrical switch to tackle the nail stuck in your garbage disposal.
To locate the electrical switch, start by identifying the electrical circuit that powers your garbage disposal. This can usually be found in your home’s circuit breaker panel. Look for a labeled switch or fuse that corresponds to the disposal’s power source.
Once you’ve located the correct circuit, make sure to take safety precautions when handling electrical switches.
Before touching anything, turn off the power supply to avoid any accidents or electrocution. Use caution and wear protective gear such as rubber gloves and safety goggles.
Remember, electricity can be dangerous if mishandled, so always prioritize safety when dealing with electrical switches.
Step # 9: Turn on the power supply
Before we can proceed with removing the nail stuck in your garbage disposal, it’s essential to ensure that the power supply is turned on.
This step will allow us to test the disposal and assess its functionality. To turn on the power supply, locate the electrical switch typically located under the sink or on a nearby wall. Carefully flip the switch into the ‘on’ position.
It’s important to note that safety precautions must be taken during this process. Ensure that your hands are dry and free from any water residue before touching the switch.
Additionally, make sure no other appliances or electrical devices are connected to the same circuit to avoid overloading it.
Once you’ve turned on the power supply, we can move forward with addressing the stuck nail in your garbage disposal.
Frequently Asked Questions
Is it necessary to gather any specific tools or materials before attempting to remove a nail stuck in a garbage disposal?
Before attempting to remove a nail stuck in a garbage disposal, gather necessary tools like pliers and a flashlight. Don’t forget safety precautions such as turning off power and wearing gloves. Let’s get started!
How do I turn off the power to the garbage disposal to ensure safety during the removal process?
To turn off the power to your garbage disposal, locate the electrical circuit breaker in your home and flip the switch that controls the disposal. This ensures safety during troubleshooting and prevents future nail incidents.
Are there any alternative methods to remove the nail if it cannot be easily accessed or pulled out?
If the nail is difficult to access or pull out, there are alternative methods to remove it. One option is using needle-nose pliers or a magnet to grab and extract the nail from the garbage disposal.
What potential damage should I be looking for after successfully removing the nail from the garbage disposal?
After successfully removing the nail from the garbage disposal, I should check for potential complications such as damaged blades or a misaligned unit. It is important to dispose of the nail properly to avoid any further issues.
How do I safely turn the power back on to the garbage disposal once the nail has been removed and any necessary repairs have been made?
To safely turn the power back on to the garbage disposal after removing a nail and making necessary repairs, follow these steps. First, ensure safety precautions are in place. Then, test the power using a multimeter or voltage tester before switching it on.
Conclusion
Well, folks, we’ve reached the end of our nail-removing journey. I hope you enjoyed your thrilling adventure through the depths of your garbage disposal.
Remember, always gather your tools and materials before embarking on any DIY mission (because who needs surprises?). And let’s not forget the most important step – turning off that power! Safety first, my friends.
Once you’ve successfully removed that pesky nail, don’t forget to check for any damage. And finally, with a flick of a switch, power is restored! Congratulations on conquering this epic quest!


1 thought on “9 Easy DIY Steps To Remove A Nail Stuck In Garbage Disposal”